My good friend and fellow mafista, Melody of Handmade Luck has brought an important issue to my attention - juvenile diabetes.
In 2005, after a three day visit to the Pediatric ICU, Melody's son was diagnosed with type 1 diabetes.
Thanks to Melody and our fondness of her now teanage son, the Sacramento Craft Mafia will be participating in this year's Walk for the Cure. You can check the progress of our team at by entering our team name at the JDRF (Juvenile Diabetes Research Foundation) site: http://walk.jdrf.org/index.cfm?fuseaction=extranet.personalpage&confirmid=86722317.
In addition to the walk, Melody has also established the Sugarcube Society.
The Sugarcube Society is an Etsy shop that was established to help raise funds for research and trials for the cure of type 1 diabetes. All research done to help cure type 1 diabetes, will inevitably help cure type 2 diabetes.
All proceeds (after etsy and paypal fees) from this shop will go directly towards meeting our team fundraising goal.
If you're interested in donating an item for this shop - or just donating in general, please contact Melody at handmade.luck@yahoo.com.
Thanks in advance for your help!
Monday, July 30, 2007
Wednesday, July 25, 2007
DC Craft Mafia Show!!!

The DC Craft Mafia is putting on a holiday arts & crafts fair!!! We are so excited! We have an awesome venue, right in the heart of Bethesda, Maryland. We hope to see you there! More details about the show, including a vendor list will be listed early in September. Right now we are looking for artsy folks, so if you want to come visit DC & have great crafts you'd like to sell please apply now!
DC Craft Mafia presents
The Unusual Suspects Holiday Arts & Crafts Festival
Saturday, November 3, 2007
12pm - 8pm
The Anastasi Room
5020 Battery Lane, Bethesda, MD 20814
Over 50 6'x6' vendor spaces are available.
For more details and an application, go to
www.dccraftmafia.com/events.html
Tuesday, July 24, 2007
Tips and Treats with the San Francisco Craft Mafia!
A Family Affair: Tips & Treats with the SF Craft Mafia
Friday 22nd June 2007 - 5:56:24 AM
Join us Sunday, August 12, 2007 from 2 - 6 pm @ Stitch Lounge,182 Gough St., San Francisco, CA.
This event will feature a variety of Do-It-Yourself (DIY) activities & demos including clothing customization & embellishment, jewelry-making and delicious cupcakes to decorate! Bring a shirt to customize - all patterns, supplies and instructions will be provided. A Family Affair is a free event open to indie designers, crafty businesses and the general public alike. Sponsored by Stitch Lounge.
STATION 1:Jewelry-making: Cute ‘n easy earrings in 5 minutes.
STATION 2:Clothing customization: Get your sew on with patterns from Stitch Lounge’s published guide to clothing, Sew Subversive. Re-fashion vintage ties into wrist cuffs or bring a t-shirt to convert into a new top.
STATION 3:Embellishing garments: Sequins, felting, fringe, beads, oh my! Bring in your old duds and get bedazzled.
STATION 4:Cupcake makeover: Decorate delicious homemade cupcakes with gummy, sprinkly, frosty fun.
Presented by the SF Craft Mafia: CraftyBitch, Craft Gym, Feisty Elle, Future Momo Jewelry, MaryJane’s Attic, My Windup Bird, Saints and Sinners and Stitch Lounge.
Thursday, July 19, 2007
Norfolk Craft Mafia happenings!

The Norfolk Craft Mafia has been all kinds of busy this summer! We held it down at Pile of Craft, the awesome show put on by the Charm City Craft Mafia!


We held several crafters roundups where we hung out, worked on projects and networked with other creative folks, and hosted the first in a series of Skill Sharing Workshops entitled Get Yr Craft On(line): Photo hosting, blogs and Etsy. We will have a booth at Crafty Bastards in Washington, DC and we're also totally stoked on our upcoming Art & Craft swap meet! Check out our flyer:

Watch for more events and crafty goodness headed from our corner of Virginia, including our first annual juried holiday show, Handmade Parade! Keep checking the Norfolk Craft Mafia website for details, applications coming soon!
Labels:
events,
Norfolk Craft Mafia,
sales,
shows,
workshops
Monday, July 16, 2007
Stop, Shop & Stroll, Sacramento Style!
Stop, Shop & Stroll was a blast! We had great coffee and eats at the Coffee Garden, tons of great shopping, art, and music by the Tip Top Trio. Stay tuned for info on future events - and be sure to check out the events page on our website!
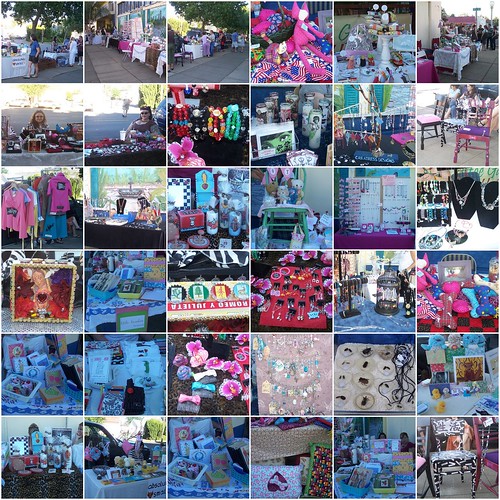
For lots more photos visit:
flickr.com/photos/sacramentocraftmafia/tags/stopshopandstroll/
and
flickr.com/photos/30298887@N00/

For lots more photos visit:
flickr.com/photos/sacramentocraftmafia/tags/stopshopandstroll/
and
flickr.com/photos/30298887@N00/
rock out with your smock out
ok Im not good at finding rhyming words that relate to crafting.
anyhow.
Pittsburgh Craft Mafia is holding our monthly craftology class and I am freaking excited for this one: business law and taxes. Thats right, how to work it to your advantage...Send your yinzer friends on over to take notes! (forgive the large pic size)

anyhow.
Pittsburgh Craft Mafia is holding our monthly craftology class and I am freaking excited for this one: business law and taxes. Thats right, how to work it to your advantage...Send your yinzer friends on over to take notes! (forgive the large pic size)

Labels:
awesomeness,
business law,
classes,
crafology,
pittsburgh craft mafia,
taxes
Thursday, July 12, 2007
Tutorial: Rubber-stamped Cards
I've been meaning to post this tutorial for ages. Missy of Crafty Carnival had some really cute rubber stamps made of her own designs. I just love them! I have made dozens of cards already! I made so many cards that I figured I would show YOU how to make them too! They are really fun and simple.
P.S.) If you like the rubber stamps, you can purchase them in Missy's Etsy store.
Step 1:
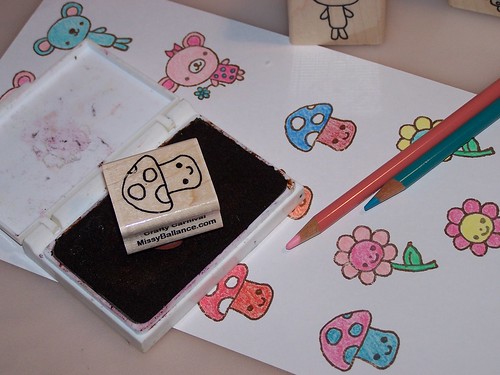
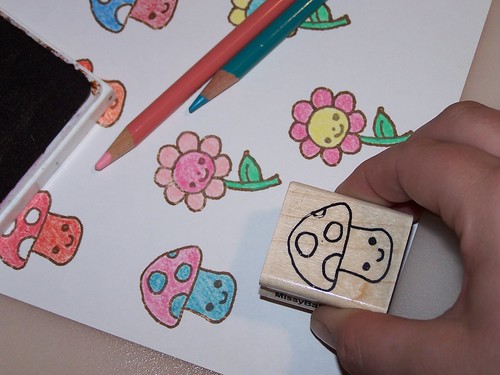
Stamp a bunch of images into a peice of white cardstock for multiple cards (or you can just do one at a time). I used a brown stamp pad for a low-key vintagy feel.
Step 2:
After you've stamped your images, color inside the lines with your favorite brand of colored pencils.

Step 3:
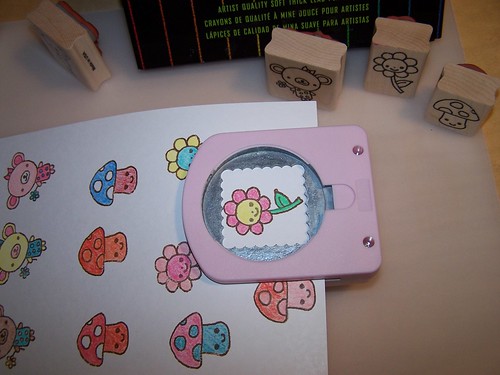
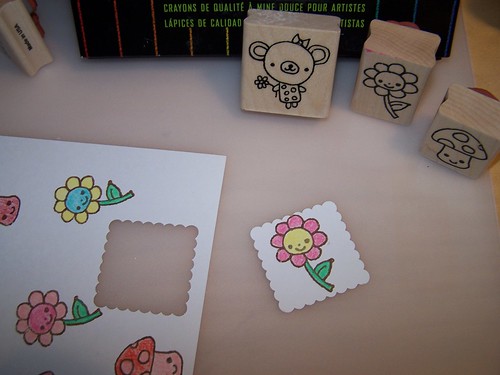
Use a large paper punch to cut out pretty shapes around the stamped images. It might actually be easier if you punched the paper BEFORE stamping (trial and error, right?) But since I didn't do that, I punched upside down so I could see more clearly what area would be punched out (making sure not to cut off my stamped image).
Step 4:
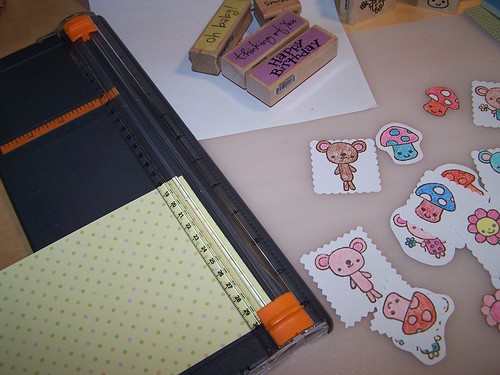
Use a paper cutter to help you cut out a rectangle of scrapbooking paper, which matches the colors used in the stamps. The rectangle should be smaller than the card you plan to mount it on.
Step 5:
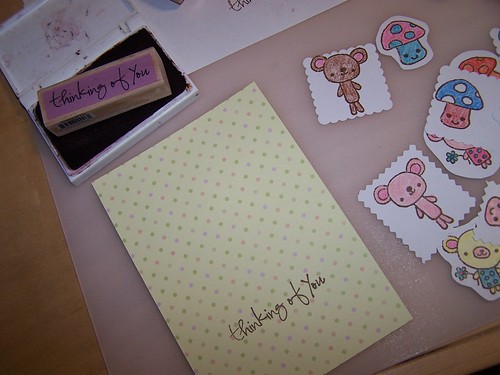
You can use a stamp with an appropriate word or saying (you can often get these in the $1 of craft and discount stores). Stamp it in the brown ink, directly onto the scrapbook paper.
Step 6:
Use some double-sided mouinting foam on the back of your stamped image. Mount it on the scrapbooking paper. (You can find mounting foam at dollar and discount stores for much cheaper than at rubber stamping and scrapbooking stores, FYI).

Step 7:
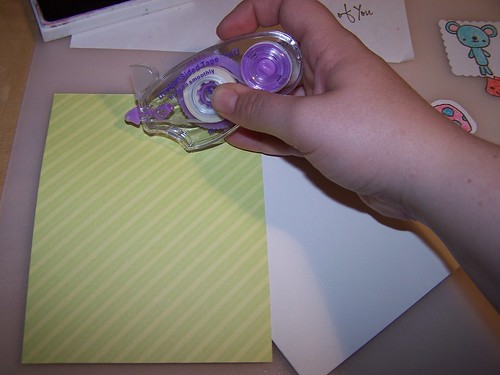
Use a double-sided tape pen on the back of the scrapbooking paper. I love these! You can also get them for WAY cheaper at dollar and discount stores and they work beautifully. Use the pen all around the edge of the paper and then in sort of a grid pattern in the middle. Center the scrapbooking paper onto the front of a pre-made card.
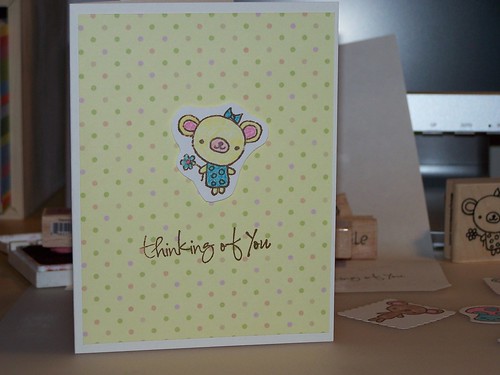
And you're done!
P.S.) If you like the rubber stamps, you can purchase them in Missy's Etsy store.
Step 1:
Stamp a bunch of images into a peice of white cardstock for multiple cards (or you can just do one at a time). I used a brown stamp pad for a low-key vintagy feel.


Step 2:
After you've stamped your images, color inside the lines with your favorite brand of colored pencils.

Step 3:
Use a large paper punch to cut out pretty shapes around the stamped images. It might actually be easier if you punched the paper BEFORE stamping (trial and error, right?) But since I didn't do that, I punched upside down so I could see more clearly what area would be punched out (making sure not to cut off my stamped image).


Step 4:
Use a paper cutter to help you cut out a rectangle of scrapbooking paper, which matches the colors used in the stamps. The rectangle should be smaller than the card you plan to mount it on.

Step 5:
You can use a stamp with an appropriate word or saying (you can often get these in the $1 of craft and discount stores). Stamp it in the brown ink, directly onto the scrapbook paper.

Step 6:
Use some double-sided mouinting foam on the back of your stamped image. Mount it on the scrapbooking paper. (You can find mounting foam at dollar and discount stores for much cheaper than at rubber stamping and scrapbooking stores, FYI).

Step 7:
Use a double-sided tape pen on the back of the scrapbooking paper. I love these! You can also get them for WAY cheaper at dollar and discount stores and they work beautifully. Use the pen all around the edge of the paper and then in sort of a grid pattern in the middle. Center the scrapbooking paper onto the front of a pre-made card.

And you're done!

Tuesday, July 10, 2007
I recently joined Etsy's Trashion Team (a group of artists who use recycled materials) and while looking at the list of other members, I came across the hats of Pillbox Productions.
I was INSTANTLY smitten with her vintage fabric hoods. Hoods are perfect for San Francisco wind and mist. I crochet them for myself to wear during the winter months, so of course I had to get one of hers made out of repurposed vintage fabric. Choosing just ONE hood was not easy!!! I am smitten with others including the the orange roses hood(shown below).
She also has lovely summer hats (some that remind me of a modern take on a 20's Cloche), adorable recycled paper flower pins and re-purposed albums turned modern art.

Wednesday, July 4, 2007
Indie Shopping
I went to Brooklyn this past weekend & while I was there I showed my wares at the Brooklyn Indie Market on Smith St. This cute little outside market features different emerging indie designers each weekend. When I was there I was most impressed by the work of Kisha Turner, ethnic clothing designer. You can see her work at http://kishatawaladesign.com.

The Brooklyn Indie Market will be open every Saturday & Sunday through December.
http://www.brooklynindiemarket.com

The Brooklyn Indie Market will be open every Saturday & Sunday through December.
http://www.brooklynindiemarket.com
Tuesday, July 3, 2007
Bend-the-Rules Sewing
 I recently discoverd the new book, Bend-the-Rules Sewing, by Amy Karol. I am most definitely a "bend-the-rules" kind of gal when it comes to crafting. If there's a shortcut that won't ruin the integrity of my work then I'll take it!
 If the name Amy Karol sounds familliar, it's probably because you've seen her blogs, Angry Chicken and Tie One On (about all things aprony). Speaking of aprons, there's some great ones in this book!
In fact, there are 30 great designs in this book (including the pillowcase clutch pictured on the cover) and it's great for beginners - that means even I can use it!
If you still aren't convinced that you need this book, check out the Flickr group for more photos.
Subscribe to:
Comments (Atom)
